It is important to remember that you are planting a habitat and it may take a few years to become established. Planting a pollinator garden is very different than planting vegetables or annual flowers!
Here are the 6 steps to create an awesome pollinator garden!
 Source: Hamilton Pollinator Paradise Project
General Information
It’s important to plan ahead. Choose an appropriate spot for your pollinator garden so you can choose the right plants that will grow in that location. Your site will determine what kind of garden will grow well. If you have a lot of mature trees with lots of shade, you'll want to consider a woodland garden. If you have an area that's mostly sunny throughout the day, you can plant prairie or meadow plants. Or you can plant a wetland/pond garden if you have a wet area perhaps beside a creek, or if you want to build a pond.
Consider how that space is currently used - for play, for dogs. You want to maximize your enjoyment of your property and build a garden that will add enjoyment to your current lifestyle.
Building a pollinator garden takes a few years, and you'll likely want to add or change things as you experiment with your garden. Consider starting a smaller garden, and then plan to expand as you gain experience and see how it grows.
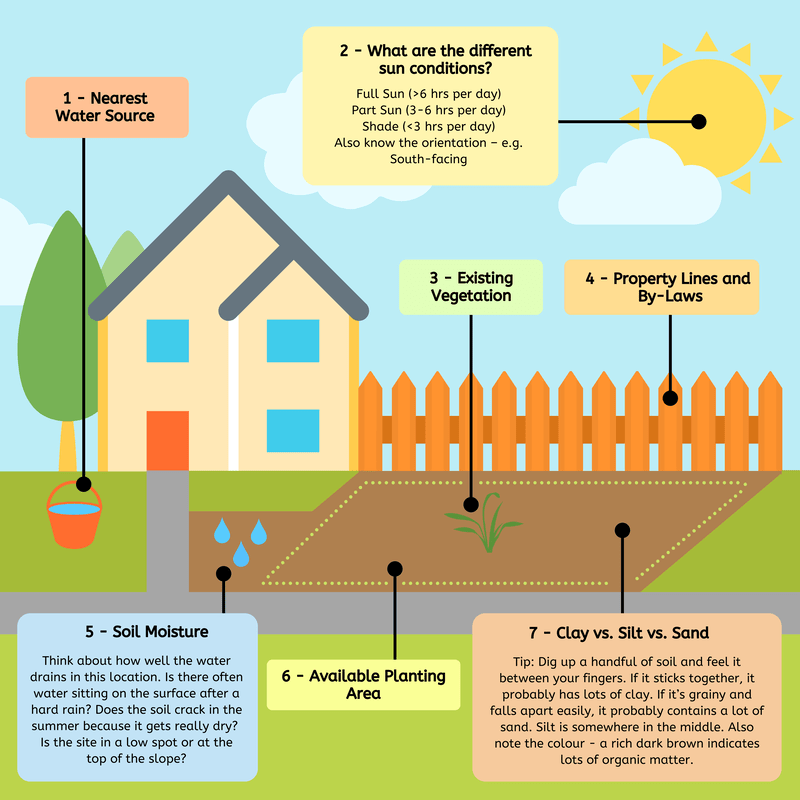
Get to know your site before choosing plant species:
- Where's your nearest water source? Once established (after a few years) your garden should need minimal watering unless there's severe draught. But for the first few years, you're going to need to water the young plants. A water tap or rain barrel should be easily accessible. Of course, a wetland/pond garden is different and has different requirements - if you're installing a pond with a pump, you'll need access to electricity.
- What are the different sun conditions? Watch the sun as it moves around your location. How much sun will your garden get? And don't forget to take into account spring/summer/fall sun exposure, especially as your trees start to get leaves that block the sun more.
- What is the existing vegetation and how will you deal with it? If you have a well established grass area, you'll want to minimize the time and effort of establishing a garden. Consider doing lasagna beds.
- What are the property bylaws that may affect your garden? You can find the local by-laws here: https://www.greatersudbury.ca/city-hall/by-laws/
- What is your soil moisture and how does your spot drain? Some plants like dryer soil, and some like more moisture. In a very wet location, you can build a rain garden.
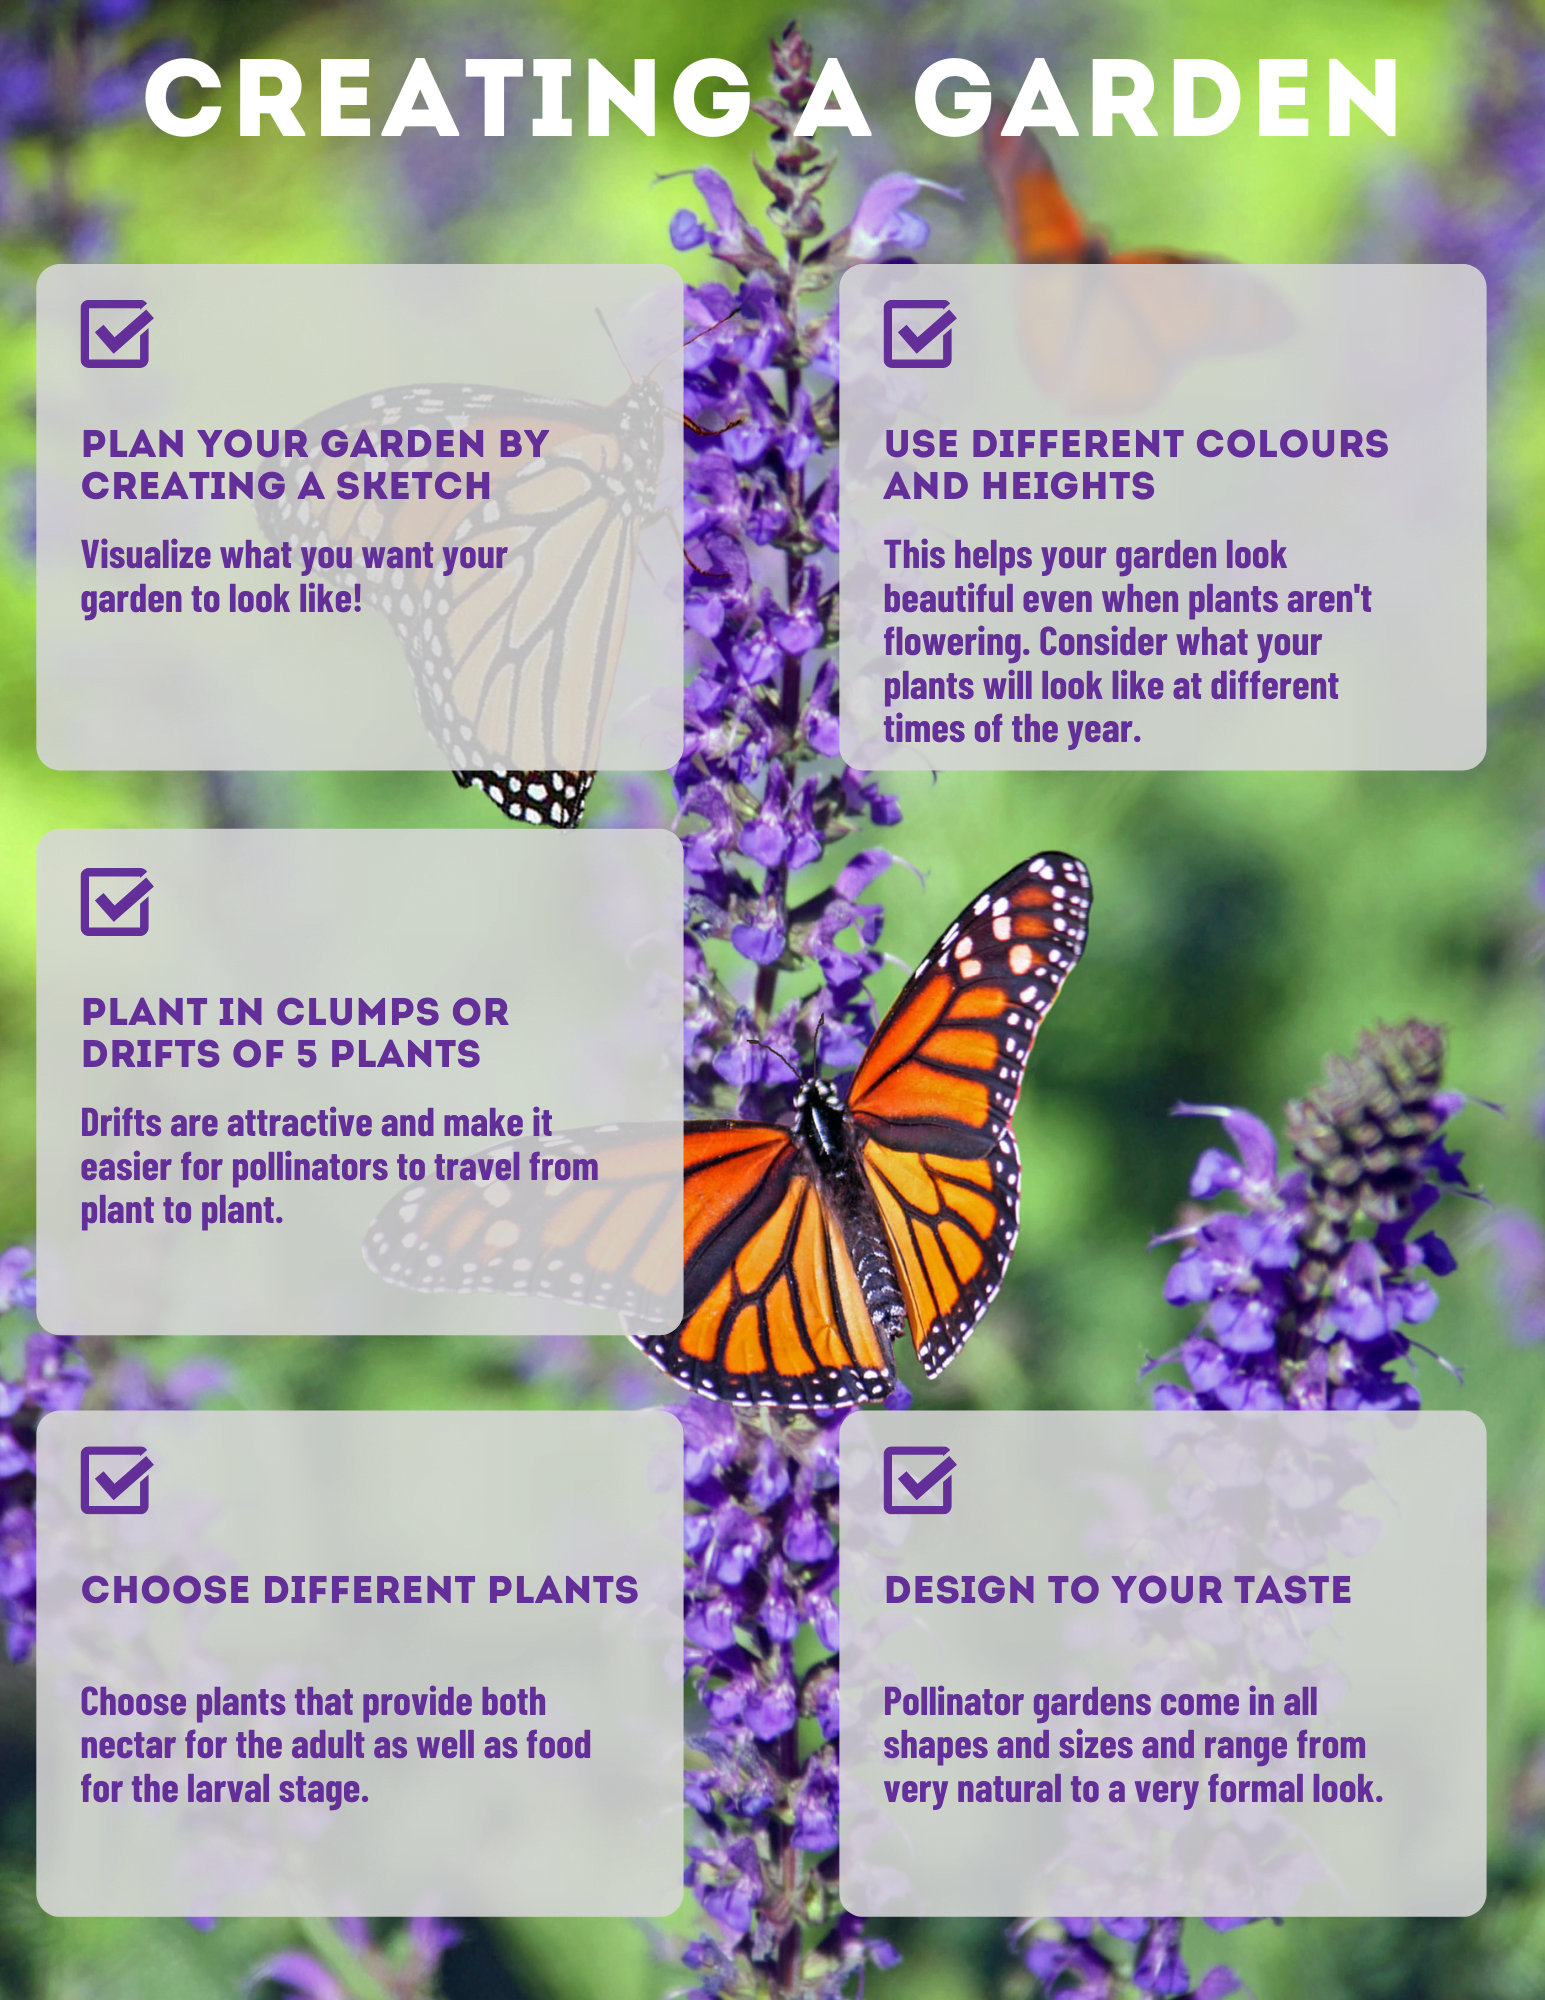
- How large is your available planting area? Some mature plants take up a lot more room than others. Remember that wildflowers like to be in "clumps", so you'll want to plant at least 5 plants of the same species together to create a "drift".
- What is your soil like eg clay vs silt vs sand? Most plants will want a rich "loam" environment with lots of organic matter. You can amend soil by adding compost and mulch, and by not disturbing the soil as much as possible.
- In Greater Sudbury, if you suspect that your earth may be in an area where there has been contamination, consider getting your soil tested.
 Include as many of the following elements as you can to create the ultimate pollinator paradise:
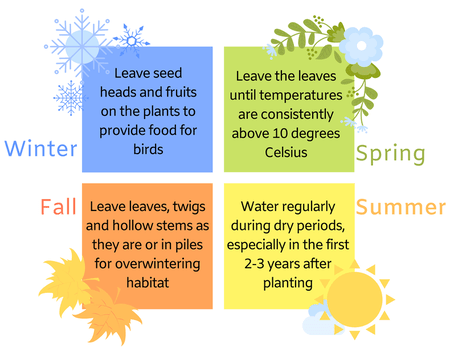
- Native plants with a variety of flower shapes/colours, bloom times (spring, summer and fall), heights and textures.
- Trees and/or shrubs for food, shelter and nesting habitat (many wild bees nest in logs or hollow stems).
- Bare, open ground, free of mulch for the ground nesting bees. Look for evidence of nesting (holes in the ground similar to those made by ants, but usually larger and with no ants around them!) and avoid mulching these areas. Ground nesting bees often do not like areas with too much vegetation so it is usually a hot, dry area devoid of grass due to drought or trampling.
- Loose leaves and brush for shelter and nesting habitat. You can also cut hollow stems of various diameters into long pieces and bundle them together for wood-nesting bees - each species prefers a different hole diameter. For more information about nests for native bees, click here.
- A water source such as a puddle or shallow water dish.
Include a flat rock with clean sand or mud in it for butterflies and other pollinators to land upon. Replace the water daily to prevent mosquito larvae from hatching. We do not usually encourage the use of bird baths for pollinators as they are too deep. However, they can be modified by half filling with sand (or small pebbles) and sloping it up on the sides to create a dry 'beach' area the insects can land to lap at the water without falling in. - A water dish with sea salt which provides needed salt and minerals, and another with rotten fruit for butterflies (again, having sloped sand allows butterflies a place to land without falling in).
- Rocks for sunning. South-facing rocks and logs are good for pollinators who like the warmth from the sun.
- Optional: pathways and/or seating so you can enjoy your garden.
- Choose plants that are suited to your sun, soil and moisture conditions.
- Variety is the spice of life! Choose a variety of bloom times (spring, summer and fall), flower colours, flower shapes, textures, heights, plant families and growth forms.
- Plant at least one shrub or tree if possible. They are amazing sources of food, shelter and nesting habitat and also support other wildlife, like songbirds!
- Avoid exotic plants and cultivars of native species (‘nativars’).
- Don’t plant invasive plants. Ask at the garden centre or do a quick search on the internet to make sure you’re not buying invasives.
- Choose plants from local seed sources.
- Include larval food sources (e.g. milkweed for Monarch caterpillars).
- Leave some seedheads standing all winter for the birds to eat (shrubs are great!).
If you’re not sure if a plant is native or if it’s locally sourced, ASK! The seller should be able to provide this information.
Important!
It is not always easy to find native plants. As well, it is necessary to check for Latin names of plants because some plants are sold under the guise of cultivar names or common names, which can be confusing. For example, the invasive Norway maple is often sold as a ‘Red Maple’ which is actually the common name of a native species. Pollinators need native plants to stay truly healthy.
Source: Hamilton Pollinator Paradise Project
 It's also important to ensure that the native plants you choose are native to the Greater Sudbury area. Many sources will indicate that plants are native to Ontario, but Ontario has many ecological zones, and plants that are native to the Toronto area for example, are not necessarily native to the Greater Sudbury area. The plant list we are using on this site is sourced from Pollinator Partnership Canada's The Algonquin-Lake Nipissing Ecoregion Plant List.pdf
There is no rule that says that you can't use naturalized plants eg a non-native plant that does not need human help to reproduce and maintain itself over time in an area where it is not native, or even annuals for a splash of colour, but you should be aware that many lists for Ontario can list mostly Southern Ontario native plants.
There are several ways to prepare your existing site, and some are more work-intensive than others. The Sudbury Community Garden Network and Sudbury Shared Harvest have been using lasagna gardening for several years to create gardens directly on top of existing vegetation. This works really well and saves a lot of time and effort. View the Sudbury Shared Harvest and Greater Sudbury Public Library webinar on lasagna gardening!
The info below has been sourced from the Hamilton Pollinator Paradise Project with additional comments from us.
Weed by Hand
Works well for small areas that are already garden beds or relatively bare patches with some weeds. If you have established grass, this can be a big job, so consider alternative methods.
- Pull weeds by hand or use garden tools to get as much of the root as possible, and place the weeds in the garbage - do not put them in your compost pile or bins!
- You may need to repeat this a few times before planting.
- Add some compost, manure or topsoil - you’re ready to plant!
Create Lasagna Beds
Works well for large areas and/or areas with aggressive weeds or lawn.
- Mow the area as close to the ground as possible.
- Add a suppression layer of cardboard, thick newspapers or compostable leaf bags over the entire area. Tip: Ask a local store where you shop for cardboard they are throwing away. Or watch on your street for people putting out cardboard on garbage day. You should strip off all tape (plastic is not good in your garden!), and choose cardboard with little ink if possible. Do not use "glossy" print materials.
- Add one or more soil-building layers (at least 3” thick) of manure, leaf or food waste compost, and/or topsoil on top of the cardboard/newspaper. Some lasagna builders will add straw layers (not hay which contains many seeds!) and leaves that have been broken down by running them over with a lawnmower.
- Plant directly into your soil layers. You can plant right away or, if you are dealing with particularly tough weeds, you may want to wait a few weeks before planting. For larger plants, cut a hole in the cardboard and dig a hole appropriate to the plant.
- Add a layer of mulch, BUT leave some bare patches so bees can access the ground for nesting. Natural mulch is preferable to coloured (dyed) mulch.
Solarization
Works well for large areas and/or areas with aggressive weeds or lawn.
This method can also be combined with the lasagna method. Solarization should be done the season prior to planting (in spring or summer) to allow time for solarization to occur (for example, solarize in the summer and then plant in the fall). Consider using recycled plastic--your local nursery, greenhouse or local contractors may have used plastic they’d be willing to give away (e.g. old vapour barriers).
- In spring or early summer, mow the area as close to the ground as possible.
- Lay a sheet of thick, clear, flexible UV plastic film over the area (like a vapour barrier).
- Using a shovel, dig the edges of the plastic into the ground around the perimeter of the area, forming a seal. Alternatively, use bricks or heavy materials to hold the plastic down around the edges
- Wait at least 6 weeks for the sun to work its magic. For aggressive weeds, wait 2 to 3 months.
- Uncover the area, store the plastic for reuse, and plant!
Sod Stripping
Works well if you want to replace a lawn or turfgrass with pollinator plants or if you don’t want to wait too long before planting.
- Rent a sod stripper and strip away the turfgrass in the planting area
- Mix a bit of compost into the now bare soil (optional)
- You’re ready to plant!
This is our least-favorite method as it's more labour-intensive, and it's more destructive to the soil too and to the worms and micro-organisms that live in it.
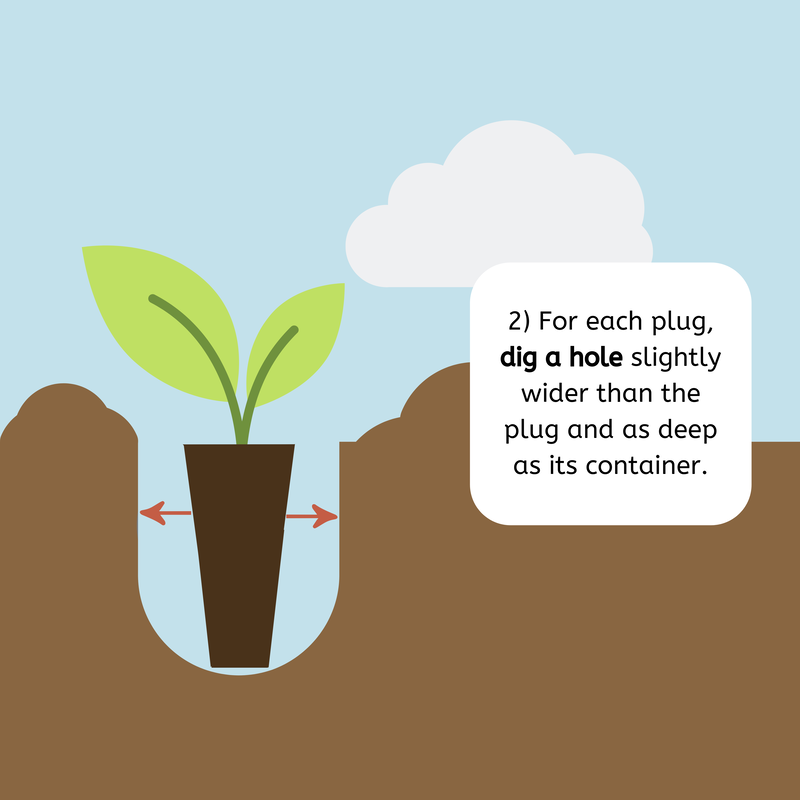
Plant seedlings or more mature plants (plugs)
How to plant plugs that you have grown from seed or purchased from a native plant supplier:- Consider the size and dimensions of plants. They will get bigger! Find information on the final height and spread of many species online.
- Fall is the best time to plant. Let the plants become established before a hot summer season.
- Spring planting will work, too, but avoid July and August! Make sure that you know that seedlings have been "hardened" to the outside and are ready to be planted right away. Hardening means getting the plants used to the outside if they've been raised inside. If you're not sure, or you've raised your plants inside: on day 1, put your plants out for a few hours in the shade and protected from the wind. Increase the number of hours per day for at least a week, including generally increasing them to sun exposure.
- Do not plant plugs during long periods of hot, dry or windy weather


Preparing seeds before planting
Seeding, dormancy, and scarification In nature, native seeds become dormant over the winter and they will not germinate until conditions are favorable for the seedlings survival (usually spring but fall for some species). You'll need to check the instructions for each seed that you want to plant to ensure that your seeds will germinate. Generally, you'll want to plant your seeds in the fall or early spring. In many cases, planting in the fall will save you the hassle of preparing the seeds prior to planting in the spring. A physical or mechanical dormancy is a hard seed coat or waxy layer that keeps water out of the seed. Dormancy caused by physical barriers is overcome in nature in several ways including mechanical rubbing, freezing and thawing, digestion by soil microorganisms, passage through the digestive tracts of animals, and fire. A chemical dormancy occurs when any of a number of chemicals are present in the seed coat that inhibits germination even when the seed is high in moisture content (fully imbibed) and ready to germinate. The chemical or chemicals responsible have to undergo a chemical change to something else or be leached or washed out of the seed before germination will occur. Chemical dormancy in seeds is broken when they are subjected to one or more of the following conditions:- Spending a period of time being cold.
- Spending a period of time being cold and moist.
- Being in the presence of light for a period of time.
- Being in the absence of light for a period of time.
- Scarification: Rub seeds with sandpaper; put 1/3 to 1 cup of seeds in a blender on low speed and hitting the button several times.
- Cold scarification: Place the seeds in a refrigerator or unheated building for one to four months depending on the species.
- Damp or moist stratification: Place seeds in a plastic zip-lock bag or plastic container with a tight fitting lid. Add about an equal volume of clean sand, or if storing at room temperature, peat moss or sphagnum. Then water to moisten and then mix contents. The seeds should have a little excess water for the first 24 hours so they can absorb all they will. After 24 hours, add more medium if water is settling to the bottom of the container. Seeds should be moist not wet as they can drown in too much water. Store for the desired length of time at the specified temperature, before attempting to germinate. Check the seeds occasionally to make sure they are not drying out. Seeds that need a warm moist stratification usually require a cold moist stratification to follow before they will germinate.
- Cold moist stratification: Do damp stratification, but then put the seeds in the refrigerator.
- Freezing and thawing: Freezing and thawing of seeds seems to speed up the stratification process compared to storing them at a constant refrigerator temperature.
- Light: Expose the seed to light during germination. Either don’t cover the seed at all or cover very lightly.
- Hot water: Pour hot water (76-100 deg C) over the seeds and let them sit overnight before planting.
Seeding outside
The best time to seed is in the fall, or early spring (March). Make sure you check for special instructions re stratification or special germinating instructions.- Ensure that the site is prepped, free of weeds and moist, and that the soil is loosely packed.
- Decide whether you want to plant in large masses of single species or create/purchase a mixture.
- Mix the seed with coarse sand or sawdust so that it can be evenly distributed and so that you can see where the seed has fallen.
- Hand-broadcast the seed over the entire area, at a density of about 1-2g of seed per m2.
- Press the seeds into the soil by hand or by lightly walking over the entire area (they should be close to the surface, as precipitation and frost-heaving will work them into the soil).
Starting seeds in pots/trays/bags
If you’re not ready to plant outside right away, or want to be able to place your plants in more exact locations, you can start them inside and then plant them outside in the spring when it's time to plant them. Most plants should be planted outside after the last frost date, which is March 21 in Greater Sudbury (according to the Farmers Almanac). You may want to wait until the second week of June to ensure there is no surprise frost. Trees and shrubs have special instructions, so make sure you talk to your supplier about how to plant what you've purchased. For native wildflowers (sometimes called forbs eg not grass-like): Most native plants require stratification, so make sure you've followed any special instructions prior to planting your seeds. Generally, you can seed over the winter (between December and mid-March) and then transplant outside in the spring.- Use a soil-less mixture to plant your seeds to avoid pests or diseases. Vermiculite is also an option.
- Choose your planting containers. You can use peat pots, recycled sanitized plant pots/pod packs from previous plant purchases, diy pot alternatives, soil blocks, trays, or bags.
- Add seeds to the bag, pots or tray. If you’re using a bag, the volume of seeds should be about half the volume of planting medium in the bag. If you’re using a tray or pots, spread the seeds out across the soil surface.
- Ensure all seeds have good contact with the soil or vermiculite - shake and pat down the baggie, or add a little soil on top of the seeds in the tray/pots (but the seeds should not be too deep!).
- Seal the baggie, or cover the tray/pots with clear plastic or a ziploc bag to seal.
- Label your plantings with the species of seeds and the date.
- Place your plantings in the refrigerator, an unheated building like an outside garage or even outside in a sheltered location (away from direct light) for 2-3 months. Most native seeds need this period of ‘cold stratification’ in order to germinate.
- After 2-3 months, move the plantings from the cold location and into a warmer location with no direct light. If your seeds were in bags, transfer the seeds and medium to a tray covered with clear plastic. If your seeds were in trays outside, the temperature should be warming naturally, so you can leave them where they are.
- Once your seedlings germinate, gradually increase their exposure to sunlight.
- When your seedlings have at least 2 true leaves, you can transplant them into bigger pots - when their roots have reached the bottom of the pot, you can transplant them into your garden after the last frost.